If you aren’t doing squats regularly, you’re missing out! The squat is a compound exercise that benefits anyone who wants to get stronger and add more muscle to their lower body. Although it’s a basic move, you can squat in a number of different ways, from easy to more advanced. When you first start out, you don’t want to choose the hardest variation. Early on, your body isn’t strong or conditioned enough to handle an advanced version of a squat, like a back squat. Tackling back squats upfront could potentially lead to a back injury, as it isn’t as beginner friendly.
Just as you don’t skip grade school and go directly to college, you’re better served to focus on the easiest squats first and gradually progress to harder variations as your body becomes stronger and your mobility improves. Let’s look at a healthy squat progression from “grade school” to more advanced. If you’re doing a more advanced version and you’re still not getting the form right or you keep getting injured, get back to basics and work your way through the squat progression sequence again.
Squat Progression #1: Bodyweight Squats
No matter how strong you think you are, bodyweight squats are a good starting point. The best way to master proper squat and help your nervous system master the movement patterns is to do the exercise without distracting yourself with weights. Concentrate on getting the movement down and using perfect form before adding weights. It’s easy to get into the habit of “cheating” on squats by not squatting low enough. Doing bodyweight squats will help you identify this tendency and correct it. When you’ve squatted to the proper level, your thighs should be parallel with the ground. Anything less and you’re doing an incomplete or half squat.
Of course, some people descend below parallel with a squat. This is what is known as a deep squat but it’s a more advanced move. Start by mastering a full squat using good form without using weights. Once you’re comfortable with the basic bodyweight movement, have someone knowledgeable critique your form. Only then, should you progress to the next rung on the ladder or squat mastery – the goblet squat.
Squat Progression #2: The Goblet Squat
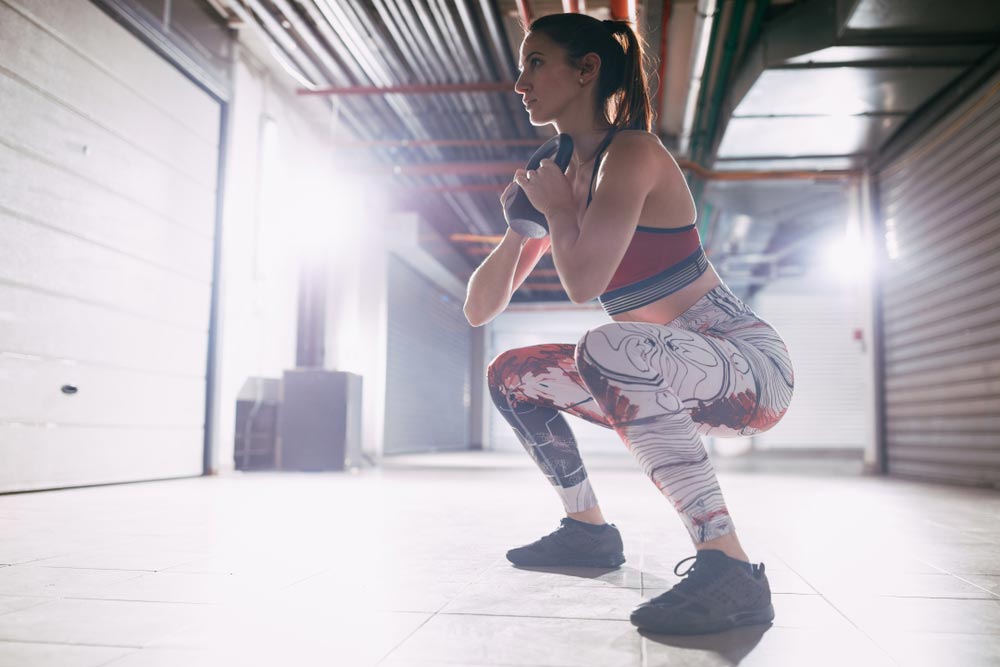
Once you can do a bodyweight squat, the goblet squat is next in the squat progression sequence. It’s the easiest squat variation to do with weight. To do one, grab a dumbbell (a light one to start out with). Grip the dumbbell vertically at one end with your hands cupped and the other end pointing toward the floor. Hold the dumbbell close to your chest at around chest height. Your feet should be shoulder-width apart and your knees slightly bent. Keep your elbows pointing toward the floor as you descend into a squat. After reaching parallel slowly return to the starting position.
It’s easier to keep your body upright when doing a goblet squat than with other squat variations. This makes it gentler on the spine. It’s also a less difficult variation to perform if you have poor ankle mobility too. When you first start out, you may have a tendency to curve your back. Don’t do it! This places added stress on your spine and back muscles. Keep your back straight and chest up. Also, keep the weight in the heels of your feet rather than your toes. Letting your weight shift toward your toes places added stress on your knees. Master the goblet squat and commit the movement pattern to memory. When you progress further in the progression, the correct movement pattern will be ingrained. That’s what you want!
Squat Progression #3: The Front Squat
Once you’ve mastered a goblet squat, the front squat is next in the progression. This is a basic squat where you do place a barbell on the front of your shoulders. As with the goblet squat, you’re keeping the weight in the front of your body. This makes it easier to maintain an upright posture when you squat, so you can lower the risk of back and spine injuries.
You can use various grips to keep the bar on your shoulders. If you place the bar correctly on the front of your shoulders, it should stay there without having to hold it tightly with your hands. Your hands are there for extra support. Place your feet shoulder-width apart and turn your toes outward at around 15 degrees. When you descend into the squat, do so in a controlled manner don’t let your elbows drop. Dropping your elbows will shift the weight forward too far and negatively affect your form.
Squat Progression #4: The Back Squat
Mastered the front squat? Then, you’re ready for the final squat in the progression – the back squat. With a back squat, you place the barbell on your back rather than on the front of your shoulders. This is a more advanced move as having the barbell on your back makes it harder to stay upright when you squat. This squat variation also places more stress on your spine relative to a front squat. That’s why it’s not an ideal squat for beginners. The back squat also shifts some of the focus of the exercise to the posterior chain. Front squats target your quads a bit more while the focus is more on the hips and glutes with a back squat.
First, master the goblet and front squat before tackling the back squat. An advantage of doing back squats is you can usually handle more weight than you can with a front squat. To do a back squat properly, place your feet shoulder-width apart with your toes pointed slightly outward. The barbell should be on the back of your shoulders. Hold it with an overhand grip. To start the movement, push your hips back as you descend into the squat while keeping your feet firmly planted on the floor. When you reach parallel, pause for a second or two. Then, use your hips to drive yourself back up. Keep your chest up throughout the movement. If you let your chest fall forward, it increases the risk of a back injury. Keep practicing! It’s a hard move to do with perfect form. Also, be aware that back squats place more compressive forces on the knees relative to the front squat. Keep that in mind if you have knee problems.
The Bottom Line
There are lots of other squat variations you can do once you’re more advanced, but this sequence is ideal when you’re first starting out. Take it step-by-step and you’ll be a squat master in no time!
References:
Stack.com. “Front Squat 101: How to Master the Move in 5 Minutes”
J Strength Cond Res. 2009 Jan;23(1):284-92. doi: 10.1519/JSC.0b013e31818546bb.
Related Articles By Cathe:
Front Squats vs. Back Squats: Does One Have an Advantage Over the Other?
5 Ways to Get More Benefits from Bodyweight Squats
How Squat Depth Impacts the Muscles You Work
5 Common Squat Mistakes You Could Be Making
Are Ankle and Hip Mobility Issues Making It Harder for You to Squat?
Which Squat Variations Target the Inner Thighs Best?
The Surprising Fitness Benefits of Half Squats
Are Squats a Good Exercise for Your Hamstrings?
Squats vs. Lunges: Which is Better for Glute Development?
Squat Tips: How to Get the Most Out of Squats and Avoid Injury


